
In compressed air systems, inline air water separators and oil coalescing filters are mechanical devices designed to remove liquids, bulk water and oil, and particulates from the air or gas.
The term "inline" is used to describe these filters because they are installed directly in the air supply line, usually between the air source and the equipment that requires clean air. By placing the filter in-line with the airflow, it can effectively capture and trap the particles, preventing them from entering the system or equipment downstream.
In this article we will discuss where to place air filters in your shop and how to install them.
Table of Contents:
- The Shop Layout: Where to Place Inline Air Filters
- [VIDEO]: Plumbing an Optimal Compressed Air System
- Before Installing: 5 Pre-Installation Tips for Inline Air Filters
- How to Install an Inline Filter: Step-by-Step Guide
- [VIDEO]: How to Install a Filter Package
WHERE TO PLACE INLINE AIR FILTERS
When it comes to placement in the compressed air system, air filters are recommended to be installed:
- After inter-coolers and after-coolers
- Prior to any air dryers
- Directly at the point of use: mounted to the equipment itself or at the base of a drip leg
This allows the filter package to remove bulk liquids, oils and particulates before entering the air dryer or the equipment itself.
As far as where in the shop to place an inline air filter, see the video below for an overview of how to plumb your shops air system:
[VIDEO] PLUMBING AN OPTIMAL COMPRESSED AIR SYSTEM
5 PRE-INSTALLATION TIPS FOR INLINE FILTERS
There are a few things to remember when installing air water separators and oil coalescing filters. The first is that any type of alteration from the original design may cause failure in operating parameters so it is best to avoid altering the filtration system.
Before any installation or maintenance, it is vital to release the system pressure.
Once that has been accomplished remember to:
- Always install the filtration system as close as possible to point of use, and as far away as possible from the compressor and any after-coolers.
- Always install the system with the arrows indicating the direction of airflow.
- Use only appropriate thread sealant on all connection fittings unless otherwise specified.
- Make sure not to over-tighten threaded connections as this may result in stripping of the threads and may cause leaking.
- Any air dryers present must be installed after the filters.
The maximum operating pressure is 250 PSI and the maximum operating temperature is 175° F. Any deviation from the maintenance instructions could result in operating failure. Likewise, exceeding flow rates can be detrimental to the operation of your system.
HOW TO INSTALL INLINE AIR WATER SEPARATORS AND OIL COALESCING FILTERS
After your air system is properly set up, the filter or filter package can be installed. This process may vary slightly based on the type of pipe in your air system. Each of the steps outlined below can be found with more in depth information in the video below.

1. Determine placement for the filter package
Look for a location relatively close to the application and after a drip leg to install a riser pipe. Decompress the system and open up ball valves. For safety reasons, ensure there is no air pressure in the piping and safety glasses are worn during the installation.
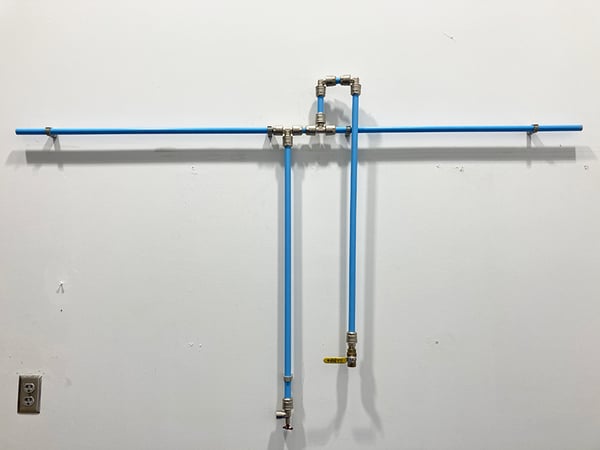
2. Install a riser pipe
Determine the size and placement of your pipe T-fitting and cut the pipe. Slide the fitting into place, adjust to ensure it is in an upright position, and lock into place. Place the pre-plumbed riser pipe system in the T-fitting and lightly secure. Do not lock into place at this step. Install a ball valve at the bottom of the pipe for easy pressurization and filter maintenance.
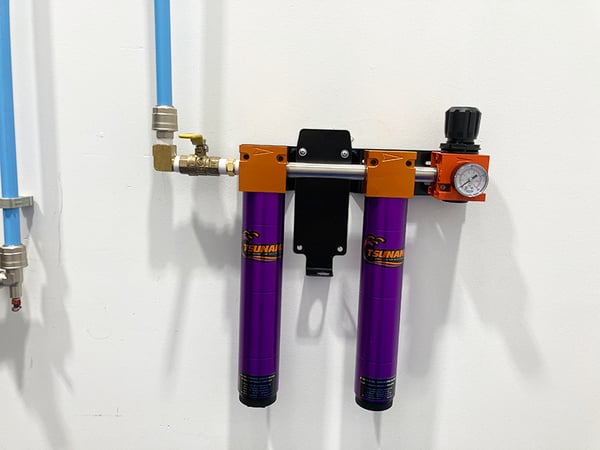
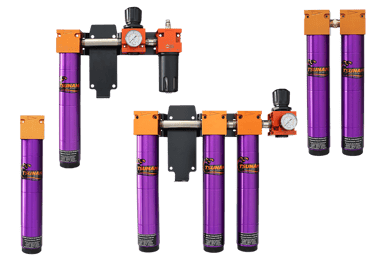
3. Install the filter package
Slide the filter package onto the pipe. Mark off and drill holes for mounting onto the wall. Screw or bolt the filter package to the wall. Install the gauge for the regulator.
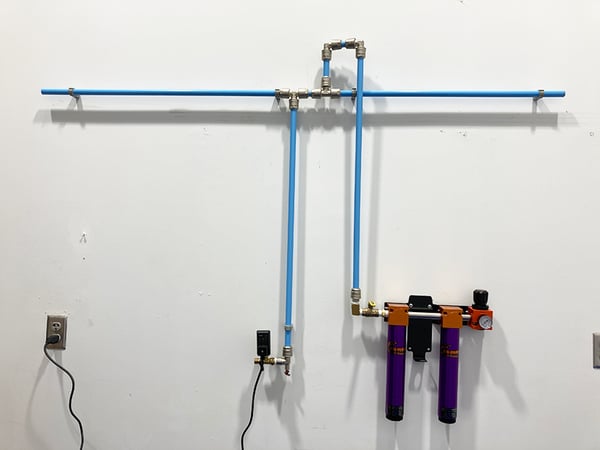
4. Tighten all pipe connections
Ensure all fitting and connections are snugly tightened to ensure a solid seal. Pressurize your system.

[VIDEO] HOW TO INSTALL FILTER PACKAGE
ADDITIONAL RESOURCES
While the installation process may be easily understood, some questions may arise once you get into the process. For more detailed information, these installation manuals are available:
These manuals provide more detailed directions and tips on what to avoid.
Read "Air Filters, Dryers & Drains: Where to place them?" for more in depth information about planning your air system.
Looking for maintenance information? Check out the "How to Service Tsunami Filters" blog with walk-through videos!
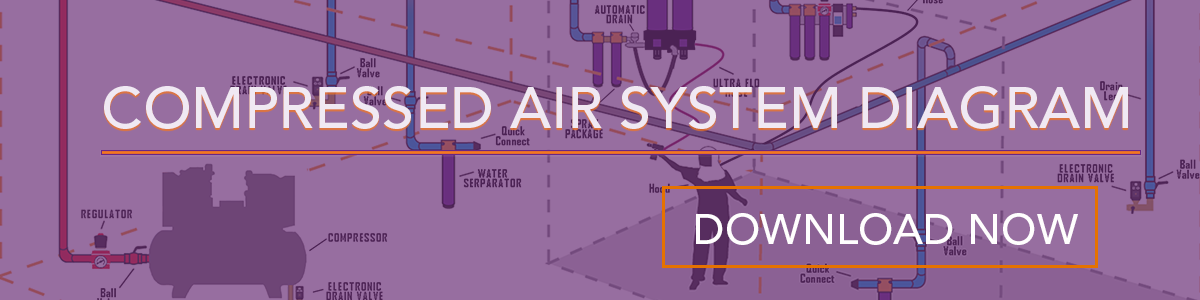
For an easy to review, on-the-go reference, download the printable Tsunami Compressed Air System Diagram by filling out the form here:
Looking for more? You can also discuss any lingering concerns with a Tsunami Compressed Air Solutions expert today.